The Search panel allows you to search for both text and visual components in a PDF. With the text search, we can search for specific text on a PDF or markups while the visual search allows users to search for specific line work.

The text search allows users to type in whole or partial words to search in a single or multiple page PDF. Navigate to the search panel which looks like the magnifying glass.
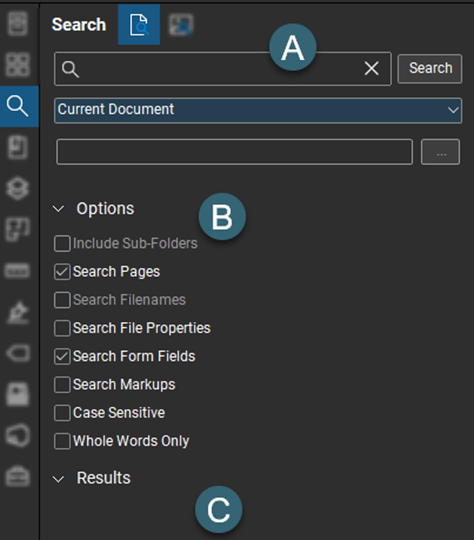
Section A:
This is the location you type the word you are searching for in the PDF. The drop-down menu allows us to choose where we are searching. Users choose from a single page all the way to searching a folder of documents.
Section B:
The options sections allows us to customize the results that we will receive. We have the ability to search for fine details in forms, markups, and file properties.
Section C:
Our results will display in this section.
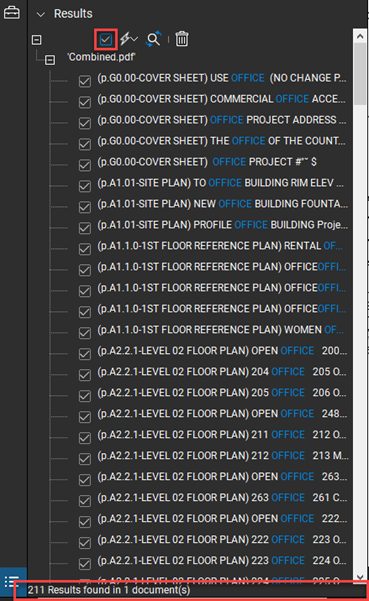
Once our results begin to display, we can see on the bottom that we have 211 instances of the word Office on this file. We select the check box at the top of the results to select all 211 instances.

The check box selects all instance listed in the results section.
The action icon (lightning bolt) allows us to perform a number of actions.
The magnifying glass icon with spinning arrows allow us to replace the words with another
The trash icon removed the results.
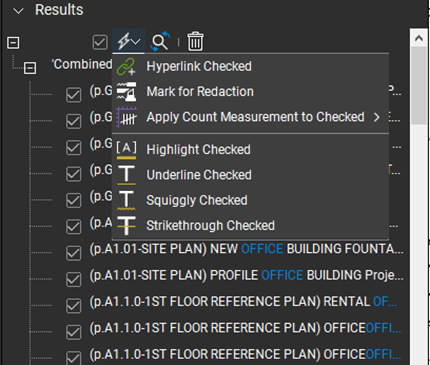 With our 211 results, we can do a number of things with this data. By selecting the action icon (lighting bolt), we can hyperlink each instance or apply a count measurement to count each instance. Lastly, we have the ability to add font styles to each instance of the word.

The visual search allows users to trace a rectangle over line work in order to search for common instances. Search for these images in a single or multiple page PDF.
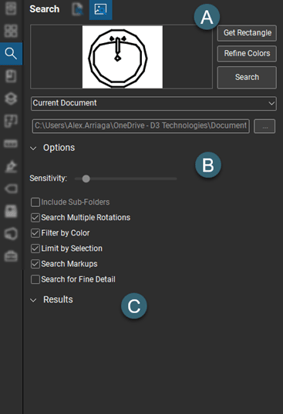
Section A:
In this section we select the "Get Rectangle" option in order to trace our rectangle around the line work we are wanting to search for. We then get a thumbnail of our search. Just like a textual search, we can search a single page all the way to a folder of documents.
Section B:
This sections allows us to define what we are looking for. The sensitivity bar is used to receive better results. The less unique a shape is the more the sensitivity I recommend. We can also search markups or fine details.
Section C:
Our results display in this section.
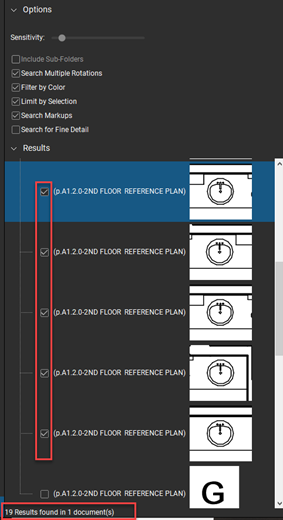
In this example, I will want to increase my sensitivity. Once we receive our results, we can pick which results are correct and which aren't by clicking the check box.
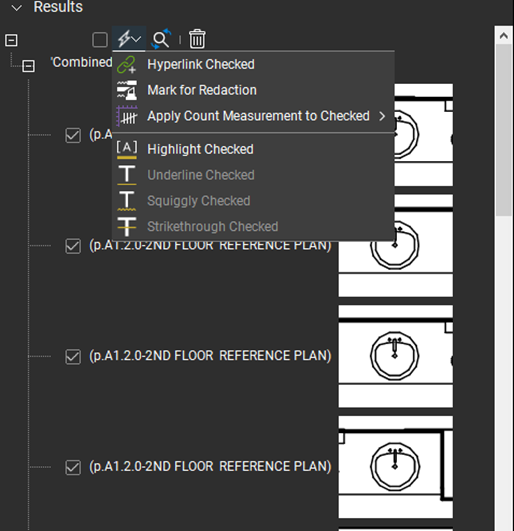
Once we have our results, we can do a number of actions from the action icon. Most users apply a count measurement or hyperlink the results.
NOTE: the search feature is not meant to take over your searching work flow. Instead, it is a tool to help you become more efficient in searching for words or line-work in a PDF.

Alex Arriaga is a Bluebeam Design Technology Specialist at MG AEC Technology Partners. Alex is a Bluebeam Certified Instructor, Bluebeam Certified Support Representative and a member of the Denver Bluebeam User Group. He works with organizations and individuals in furthering their workflows with and knowledge of Bluebeam Revu.
