
In this click saver I want to talk about using Navisworks to compare changes when you receive updated models. Since most clients have updated to the new Autodesk suites, Navisworks Simulate is included, meaning this feature is readily available to everyone.
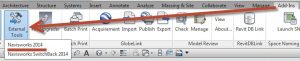
First, we need to first look at how to get your Revit models into Navisworks. In Revit, go to a 3D view and select the “add-ins” tab. Go to the “external tools” drop-down and select Navisworks- this will create a NWC file for Navisworks. You can also “append” a RVT directly to Navisworks but this method takes longer since it is opening/creating the NWC file on-the-fly.
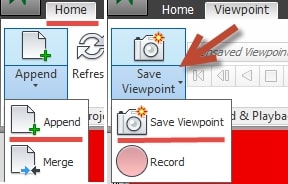
Before getting started, “append” the first model. Once loaded, go to an appropriate 3D view and select the “viewpoint” tab and create a viewpoint using the “save viewpoint” tool. This will help you get back to an original view once you are done comparing the two models.
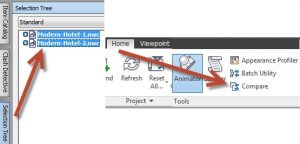
Now “append” the other model, then select both the models in the “selection tree” palette. If you don’t have the “selection tree” palette on the interface, go to the “home” tab and pick on “selection tree”. With the two models selected now choose the “compare” tool from the “home tab” and a dialog box will be displayed.
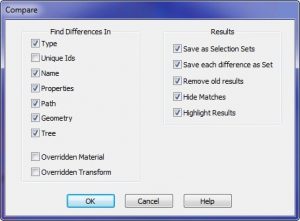
Specify the options for finding the differences between the two models by selecting the required check boxes in the “find differences in” area. You can configure the displayed results by selecting the required check boxes in the “results” area and then choosing the OK button, usually the defaults will work just fine.
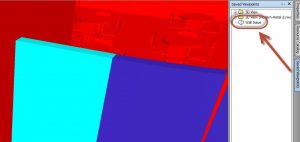
In the current view the items highlighted in red will represent the items with differences, white will represent the matching items, yellow will represent the first model containing the things not found in second model, and cyan will represent the second model containing the things not found in first model.
If it is a large model this will be overwhelming to understand at first. So how does one find the differences and clearly view them?

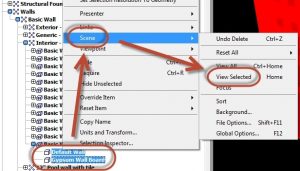
It is a combination of using the “sets” palette and the “selection tree” palette to start seeing what has changed. If you don’t have the “sets’ palette open go to the “view” tab and select the “windows” drop-down to turn it on. By picking one of the “saved selection sets” go to the “selection tree”. You will notice that Navisworks has the item(s) highlighted. Right-click on one of the highlighted items and choose “scene” and then “view selected”. It will now zoom you to the item so you can see what has changed. You can use the same Shift+Mouse Wheel to orbit the model.
By jumping back and forth between the two palettes you can quickly start to see what has changed between the models. Remember that you can create your own “viewpoints” to come back and show someone if needed. Your “viewpoints” are saved on the “viewpoints” palette and you can use the “view” tab and the “windows” drop-down to turn it on.
I hope this helps you in taking advantage of Navisworks, see you in class or at your office, Jarod

