When it comes to installing an application, many are familiar with the countless windows that require a button to be pressed for the installation to progress. With the release of Revu 21, the new process for creating and managing deployment has been modified. A deployment is recommended for organizations requiring mass installment over their network. This blog post is meant for IT managers with a basic understanding of deployments, command lines, and MSI file types.
Below, we'll take a look at the new Revu 21 deployment process.
The need for Markup Mode and View Mode is not required, as the features and functionality are now determined by the Subscription tier login.
Due to the simplicity associated with Subscription and Deployment, there is no longer a need for the Configuration Editor.
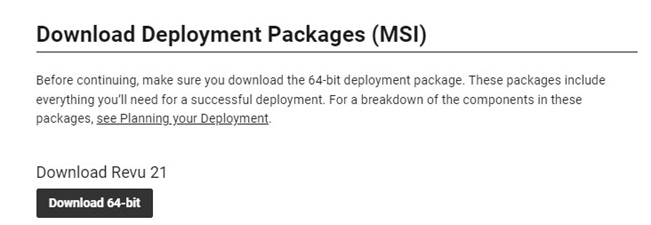
First, download the deployment package that contains all the files necessary for a successful installation. This package can be found on Revu's webpage.

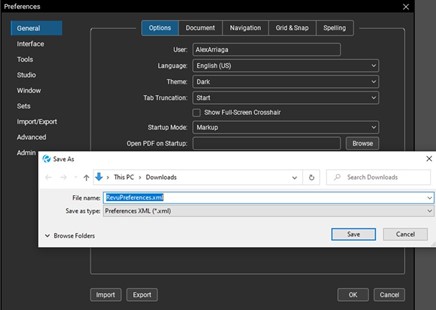
Once you have the installation files, you can begin exporting your preferences to embed in the installation. This is located under Revu > Preferences. Once your preferences are saved, you can export the .xml for future use.

Within the deployment package, an uninstall script is included to run a clean uninstall of all previous Revu products. Make note that this file is updated with every release of Revu. Changing the file type from .txt to .bat is the only requirement.
You can save this file to the deployment server and run the script as your first deployment step. Below is an example of what that command line will look like.

Once all previous versions are uninstalled, you can begin creating the installation step for the deployment. Below are some example installation scripts and an explanation of the options we have.
Note: The OCR feature is a separate install line.
/i - Tells the windows install to call up the msiexec.exe to run an installation
/qb - Tells the windows install to run in an unattended mode but displays a progress bar
/qn - Tells the windows install to run in both an unattended and silent mode
msiexec.exe /i "MySever\Bluebeam Deployment\Revu 21\Bluebeam Revu x64 21.msi" /qb
msiexec.exe /i "MySever\Bluebeam Deployment\Revu 21\Bluebeam Revu x64 21.msi" /qn
msiexec.exe /i "MySever\Bluebeam Deployment\Revu 21\BluebeamOCR x64 21.msi" /qb
Optional Properties Command Lines:
BB_AUTO_UPDATE
Enable or Disable in-app update notifications: Enabled (default) = 1, Disabled = 0. See notes.
BB_DISABLEANALYTICS
Enable or disable sending application usage info to Bluebeam. Send (default) = 0, don’t send = 1.
BB_DEFAULTVIEWER
Set as the default application (default) = 1, Do not change the default = 0
BB_DESKSHORTCUT
Bluebeam Revu desktop shortcut (default) = 1, No shortcut = 0
BB_DESKSTAPLER
Bluebeam Stapler desktop shortcut = 1, No shortcut (default) = 0
BB_FEATURES
Disables various Revu features: All Features Enabled = 65535 (default). (See Enabling and Disabling Revu Features on the deployment page)
BB_IE_PLUGIN
Install and enable = 1, Disable (default) = 0
BB_JOBOPTIONS
Enter the UNC or fully-qualified path to your custom. jobOptions file.
BB_NETCONFIG
Enter the UNC or fully-qualified path to your managed NetConfig folder.
BB_PAGESIZE
Enter "A4" to override the default page size for the Bluebeam PDF printer.
DISABLE_WELCOME
Disables the Revu HTML Welcome page and Workflow Training Videos page. Enable (Default) = 0, Disable = 1
Creates a registry entry Computer\HKEY_CURRENT_USER\Software\Bluebeam Software\21\Revu and DWORD named WorkflowsInitialized“.
BB_REVUPREFERENCES
Enter the UNC or fully-qualified path to your RevuPreferences.xml file.
IGNORE_RBT
Disable Check for Pending Reboot = 1, Check for Pending Reboot = 0
MBCODE
Determines which of the Bluebeam plugins are enabled. The default value of 1023 enables all of them. (See Enabling the Bluebeam Plugins on the deployment page)
In the example script below, we are using the install command (/i) as well as a couple of others. The "Disable Welcome" screen option is enabled with an assignment of one. Our preferences will also be applied since we are pointing to a preference file in an example server location. Lastly, the unattended option with a progress bar is enabled with the /qb command.
msiexec.exe /i "MySever\Bluebeam Deployment\Revu 21\Bluebeam Revu x64 21.msi" DISABLE_WELCOME=1 BB_PREFERENCES="MySever\\Bluebeam Deployment\Revu 21\" /qb
Sign up for our next monthly How to with Revu session, where Alex demonstrates a helpful tip for being successful with Bluebeam solutions and then answers all your Revu-related questions.
Try Bluebeam Complete today. Download your free, 30-day trial here.

Alex Arriaga is a Bluebeam Design Technology Specialist at MG AECO Technology Partners. Alex is a Bluebeam Certified Instructor, Bluebeam Certified Support Representative and a member of the Denver Bluebeam User Group. He works with organizations and individuals in furthering their workflows with and knowledge of Bluebeam Revu.

Bluebeam Revu is a registered trademark of Bluebeam, Inc., used under license.