
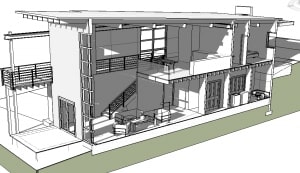
In this click Savers I want to talk about enhancing your documentation with 3D section for orthographic and perspective views. Recently I started getting questions about how best setup these up and how work with Section Boxes in perspective views. Most people have learned how to do Section Boxes in an orthographic 3D view but have troubles getting this to work correctly in a perspective view.
The issue is trying to work with the arrow grips on the edges of the Section Box when you turn on the Section Box in a perspective, a lot of the times the arrow grips are off the screen which makes this a frustrating proposition.

To get started go to a Plan View, from the View tab, under the 3D View drop-down, select Camera, and place the camera in the plan view. Now get into the newly created perspective view and turn on the Section Box in the Properties palette. There are three ways to work with the Section Box; two ways for perspective views and a bonus one for orthographic views. Let’s look at the two ways with perspective first since they are the troubling ones to work with and then we will look at the bonus one for orthographic.
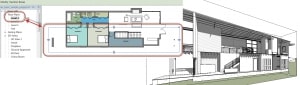
This first one I like a little better then the next one, but it really depends on which one works best for you. Select the Section Box so you see the arrow grips on the box and now go open a plan view, you will notice that the Section Box stays selected and highlighted when you get into the plan view. Now you can modify the edges of the Section Box to your liking and when you go back to the perspective view it has been updated.
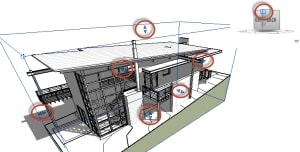
These next two involve the ViewCube; on the ViewCube pick on one of the top corners of it which cause the model to zoom all the way out so you can see all of the edges on the Section Box. Now use the arrow grips to modify the Section Box to your liking.
Now the big question, how do you get back to where you were? We are going to use the Navigation Wheel and the Rewind to get us back. If you don’t have the Navigation Bar on the screen you need to go to the View tab, use the drop-down for User Interface, and then pick Navigation Bar.

Now for the last one, I only wish that this worked on perspective view but it doesn’t, orthographic only for now, but it is still a good one to know about. Hopefully one day the factory will update it to work on perspectives but to get started get into a 3D orthographic view. For this next step to work for us you will need a 2D section view created in your project, so if you don’t have one, go create it. With that done, now right-click on the ViewCube and go to Orient to View, pick Sections and chose an existing section view or the one you just created. To get back to the original view pick on a corner of the ViewCube like we did before and notice how it matches the 2D section view, plus the Section Box has been turned on automatically for you.

See you in class, Jarod

