
In this click saver I want to talk about a Revit Family Trick that hopefully will save you some headaches today or maybe sometime in the near future. When working with clients there has been times someone has created a family using the “Generic Model Wall Based.rft” and now realize they should have made it using the “Generic Model Face Based.rft” family instead. Without knowing this little trick it usually meant that someone had to rebuild the family again, which is a real bummer and no one wants to do that.
So how does one convert a “Wall Based.rft” to “Face Based.rft” or another question might be how does one know if a family is “Wall Based” or “Face Based”?
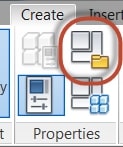
So open one of your “Wall Based.rft” or “Face Based.rft” families and pick on the “Family Category and Parameters” button.
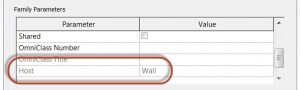
At the bottom using the scroll bar you will see “Host” and it will either say “Wall” or ”Face” depending on which family template it was created from.
So let’s say you now want to take a lighting fixture that was originally drawn as a “Wall Based” family and convert to “Face Based”. To do this you will start a new project using your favorite template and draw a wall. Now load your lighting fixture and place it on the wall, save the project and called it “Wall Base Project”. Close the project when done.
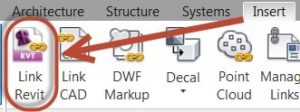
Start a new project, save it, and name it “Face Based Project”. We are now going to link in our “Wall Base Project” using the “Insert” tab and the “Revit Link” button.
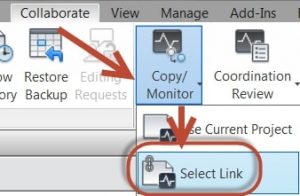
Get into a 3D view so it is easier to see your linked file and the lighting fixture. We are now going to use the “Copy/Monitor -> Select Link” tool to “Copy” in the light fixture.
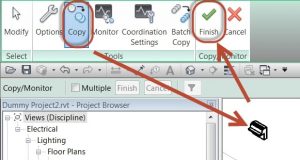
Once you have used the “Copy/Monitor -> Copy” command use “Finish” to get out of the command.
Now you can select on the light fixture and pick on the “Stop Monitoring” button. Now use the “Edit Family” tool to edit/open the family. Now check the “Family Category and Parameters” and you will now notice that it says “Face” instead of “Wall”.

I hope this little trick will help you with this type of situation arises when working with “Wall Based” families in Revit. I know that for me this has been a life saver over the years. See you class, Jarod

