
In our June 2023 How to with Revu webinar, we reviewed tips and tricks for Creating a Digital Signature in Revu. There are multiple options when it comes to creating a signature and in this post we will walk through how to create each of the different signature types.
Place a signature field on the document to hold your digital signature. Regardless of the version of Revu you are using (Core, Basic or Complete), Revu21 offers the capability to create a signature field.
To begin, add a signature field to your document by accessing either the Signature Panel or Forms Panel.

After placing the signature field, simply hover over it to transform your cursor into a pen-in-hand icon. One single click on the signature field will open up a window for either creating a new signature or applying a previously saved one.

The first option is to "Create Digital ID file". This option is the main file that is recommended since it is the most secure. Users can input their relevant personal information in the provided location. Next is the PKCS#12 option that requires the user to create a password in order to protect their signature
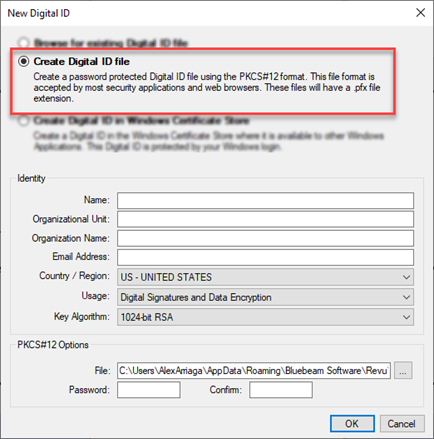
NOTE: It is important to keep track of the password you create for your digital signature. If it slips your mind, there is no way to reset or recover it, and you will need to recreate the signature.
The second option is to "Create a Digital ID in Windows Certificate Store". This option allows the user to create a signature that is password protected with their windows login.
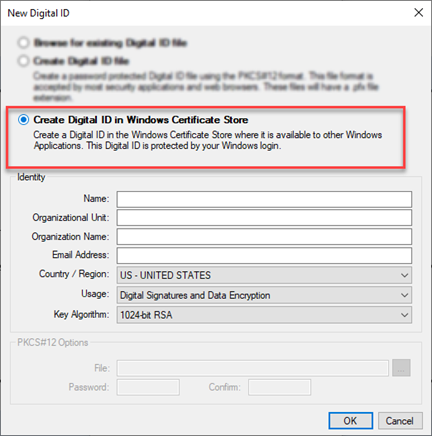
NOTE: This is the less secure of the two options.
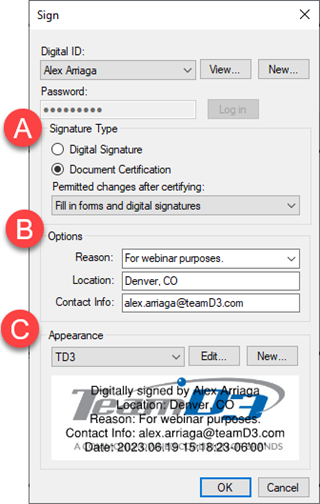
Once the signature is created, we can enter the password and select "Log in". The signature thumbnail will display below once unlocked.
A) Select the type of signature being applied. Selecting Digital Signature will sign the file and allow no changes. Document Certification will sign and allow others to sign or make changes.
B) Options for more information pertaining to the signature.
C) We can edit the signature appearance and create new styles of signatures. Add logos and margins to the signature from this location.
Once everything is correct, select OK. This will require you to save the newly signed file. The signature is placed digitally on the file.

Sign up for our next monthly How to with Revu session, where Alex demonstrates a helpful tip for utilizing Bluebeam solutions and then answers all your Revu-related questions for FREE!
Try Bluebeam Complete today. Download your free, 30-day trial here.

Alex Arriaga is a Bluebeam Design Technology Specialist at MG AECO Technology Partners. Alex is a Bluebeam Certified Instructor, Bluebeam Certified Support Representative and a member of the Denver Bluebeam User Group. He works with organizations and individuals in furthering their workflows with and knowledge of Bluebeam Revu.
![]()
Bluebeam, Revu, and Studio are registered trademarks of Bluebeam, Inc., used under license.

